Friday 28 April 2006

Another Star/snowflake

I have been mucking around a bit with another star - this one is on Wogga block #3. You can see the previous star HERE.

Wogga3

To make this one, draw the six-sided figure on the back of the block (another way to make the shapes to draw inside various sized spanners to make templates).

Run long stitches from each point, with a small join in the middle. Then you have this:

Star2a

Now, remember I am still experimenting. Then I put Fly stitches around the spokes, eyeballing where they should finish. An out circle drawn on the back may have made me more consistent.

We're up to here:

Star2b

Then I put a Fly Stitch inside each section:

Star2c

In this case I tried taking the leg of the Fly just across the centre. It means thee are no gaps, but it gets a bit bulky.

Then I added two opposing Fly stitches in each section.

Star2d

If this wasn't such a minimalist work I would probably add some rather nice beads at this point.

I'm due to disappear for a few days - back on Wednesday.

Thursday 27 April 2006

First Mirror Block

Mirror4

The first Mirror block is pieced - it is going to be a most unscientific piecing - the pieces of embroidery will be larger than the other patches in each block. But I think that will add to the "different" look. I am going to try and avoid the five-sided centrepiece in blocks, rather go for a "very unstructured" look.

Stitching is going to have to be very simple, as the patterns are very busy.

LATE NOTE - there is now a Flickr set for this quilt - it includes some older pictures of this supper cloth, and ways I have worked it in the past and may use again in this quilt.

The Mirror Quilt

Having now made two squares for my Wogga, I have had enough of dark blues and greys for just a little while, so have decided I am about to start a "Mirror Quilt". In other words, make one drab block, take what I have learned, and make a beautiful block, using the same size blocks and joining technique, and the stitches I like from that block.

So I have taken a child's robe I found in an op shop:

Mirror2

To it I have added other fabrics I collected from all over the place, the last being a fat quarter of apple green silk, that I bought this morning at Spotlight. In a way it was expensive - they didn't have it on the roll, but they actually had a pack of eight fat quarters in silk for $29.95 - the code, if anyone else in Australia wants to ask their Spotlight if they have the same, or can get them, is 1083364 - they apparently had other colours, but this pack wasn't popular.

But, having looked at the in nice, natural daylight, I am not going to use the brown silk, nor the kimono print (sob!), as it is just too yellow. At this stage.

And yes - I am going to cut up the cloth my mother started (and then stopped) embroidering over fifty years ago. It will never get finished, and even if it did, it then wouldn't get used - this is not a supper cloth type of household.

Mirror3

And my Mother agrees!

So these blocks will be similar to the Wogga ones - I am working with stitches only, and only in cotton. I may add some tatting, but haven't decided on that yet.

I'm off to piece the first block.

Wednesday 26 April 2006

Wogga Block 2 finished

Wogga2b

The second Wogga block is almost finished - I only have a few more combinations to dream up to go around the blanket stitch on the edge.

The largest size is HERE. (You may have to click on the image to get full size)

I have joined the two to show how the finished blocks will be joined - I think I will vary the colours I use to crochet around them. And I know there are stitches missing - I sew, and crochet only when necessary. I need to get the rustic look somehow *grin*

Tuesday 25 April 2006

ANZAC Day

Today my heart is heavy, as it is our ANZAC day, and my small town has been turned into a media circus as we have just lost our first soldier to die in Iraq - which I know pales besides the losses other countries have taken. But needless, on this day we did not need satellite dishes running all over this tiny town as we are trying to remember our war dead with appropriate respect.

So here are two pictures which, for me, sum up those who are forgotten in War.

Louie

Louie Riggall was from near where I live, and died of fever while working at a hospital in France in World War I. This memorial was given to the local services league by her family, when the local memorial committee would not include her on the memorial. Why? She was a VAD (Voluntary Aid Detachment) with the British Red Cross, and she was not considered to be "enlisted". We also lost a second nurse in World War II - our country lost so few nurses, for an area to lose one in each war in unknown elsewhere. That memorial can be seen HERE.

The other photo comes from the cemetery just up the road from here.

Annie Whitelaw

I have always said I don't believe Annie would have been happy to have given her sons - I knew the last one late in life. And this town knows loss - we do not need a media circus as well.

I have finished the second Wogga block, but my Heart is heavy, so I will post it tomorrow.

Monday 24 April 2006

Davis Stars / Snowflakes

Yesterday I posted a picture that had what I am calling a "Davis Star".

WS2g

There are all sorts of stars/snowflakes on the Davis quilt, usually as a seam treatment. Some are quite complex, and I wasn't really happy with my attempt yesterday, which was based on these stars:

Star1

So, I have been looking around for some geometry equipment, and happened to see DH had this in the bag with his set squares.

Stars

It is, wait for it, a template for drawing nuts and bolts in engineering. DH was an electronics engineer, but they had to do mechanical drawing as one unit at university. So do not despair if you cannot source one of these. Just raid the shed of any nearby male, and borrow a few nuts of different sizes, draw around them and make your own templates. Or buy a few from a hardware store.

For my first star, I just drew the six-sided shape on the back of the fabric, and sewed large straight stitches from the points on one side to the other, and then anchored them with a small stitch in the centre. This was the result:

Star1a

I then eyeballed some straight stitches to get this:

Star1b

Actually, when I think of it, I might try this stage next time as a Fly Stitch with a short leg. I then extended the lines with Fly Stitch (as did Davis on occasion) and put a single Fly Stitch in the centre of each section (which is my idea), with the "leg" of the Fly Stitch finishing in the centre:

Star1c

Sure makes a lovely star/snowflake.

There are some quite complex ones on the quilt, so I will work through them slowly, and see how I go. Maybe one to a block.

Sunday 23 April 2006

Wogga Stitches 5

Here are a couple more stitch combinations.

WS2f

The one above is from the Davis quilt. Some combinations need to be all one coloured thread (this one is perle #12), and others get their charm from combining a lot of different coloured threads. And it also shows the difference a small change in the angle of the base Chevron Stitch and the Fly Stitch makes.

WS2g

There are three new stitches on this one. On the left is an added treatment to long and short Blanket Stitch that I dreamed up. It has pulled the edge out of shape, but I can live with that, and the crochet edge will hide a multitude of sins.

Along the bottom of the picture is some stacked or double Herringbone, which I first found on the Davis quilt. I do like it. The added extras are mine.

And this is the first appearance of what I will call the Davis Star. I still need to work a couple more to iron out the unevenness. Then I will explain them and build on them.

All in the second lot are perle #12 except the green in the stacked Herringbone seam, and the original long and Short Blanket titch.

Off to make Chutney. No more stitches today.

Wogga Stitches 4

WS1g

For this stitch combination I was wanting to fill a blank space in the middle of the block, but also to use the lines there for a combination that needed their precision.

So first I did the big Cross Stitch, using the see-through plastic ruler to make sure they were as wide as the lines (ie a square result), and that the stitches were half their size apart. (Don't tell anyone - first they were the same distance apart as their size - that didn't work, so they came out).

Then I did the smaller stitches across them. And it was only when I was half way through them that I knew what I was doing next. So I hadn't exactly made sure the ends of those stitches (where you can see the weaving later), were exactly the same distance apart.

What I did last was to take the lighter green, and weave it Chicken Scratch-style between the arms of the smaller crosses.

I quite liked it. So I went off and did this bit:

WS2e

Which is quite complex Chicken Scratch - and the fiddliest bit was getting the crosses the right distance apart. It was out with the see-through ruler again.

I am resisting a temptation to work a smaller daisy in the middle of each section - might try that on another block - that's the good thing about samplers.

Saturday 22 April 2006

Wogga block technique

Lillian was asking about the edging of the Wogga blocks - so since I think I have almost worked out the technique, this is it:

First, cut foundation 8.5 to 9 inches.

Piece block, allowing top fabrics to overlap a little.

Turn over, draw 8 inch square on reverse.

Trim the foundation to that 8 inch line. Unpick seams where necessary.

Turn the top fabric over the foundation fabric so you have an 8 inch square.

Baste/tack down, then blanket stitch.

Trim back any top fabric in excess.

It should then look like this:

Wogga back

Embellish as desired. If the embellishing pulles the block out of shape/size, that's life. I'll live with it.

The other thing is that these blocks are worked totally without a hoop - the block is thick enough to be easy in the hand, and my edging system means that I don't have extra foundation for a hoop. It is going along okay - despite being thick it is really easy to needle.

Crochet around, going under the blanket stitch, with a single crochet stitch. (Don't ask me its real name - I don't know. This is about the limit of my crochet expertise.)

Crochet around again, using a double stitch.

Put aside and work on more blocks.

I will then sew them together, and probably then sew them down to a blanket or through batting and backing, quilting around each square, on the crochet, and putting a button at each junction.

That's the plan at the minute.

But this might take years, so I may change my mind.

Wogga Stitches 3

Wogga1d

I am having a lovely cold wet autumnal Saturday catching up on stitches and scanning them. Above the definitely finished Block 1 of the Wogga, and here are the rest of the stitch combinations I have uploaded. The block above has the crochet around the edge ready for later joining.

WS1d

This is a perle #8 copy of a combination fro the Davis quilt - although I have added the French Knots - and not always in the middle where they should be.

WS1f

This is a perle #8 Feather Stitch, with a perle #12 Fly Stitch and then a Pistil Stitch. The trick was to realise that the inside section of the Fly Stitch was best running in exactly the same direction as the arm of the Feather Stitch it was joined to. The rest then followed.

WS1e

This was just a quickie. I wanted to try Zig-Zag Chain (the dark green), and then I didn't know what to do with it. On one side is a Fly Stitch with a Straight Stitch (light green) and on the other side a Fly Stitch with a Lazy Daisy (aka Detached Chain) in a multicoloured. All are in perle #8.

WS1c

Here I was seeing how good the lines were in the tailor's samples for me to do Honeycomb Stitch - two or more rows of Cretan Stitch. I'm a bit wonky, but I will work on it. I think the name of the stitch in the middle is Wheat Sheaf???? Three Straight Stitches drawn together. All in perle #8

Bother - I've lost another combination I thought I had uploaded. I'll save it for tomorrow, or I will run out of things to talk about.

Wogga Stitches 2

WS2d

Here are a couple more stitch combinations from Wogga block 2. The one above started being a Carole Samples one, but the angles turned out all different - it is amazing how much difference there can be in the angles on the basic Feather Stitch by varying the ratio between the width and depth.

And the three French knots are my addition to Carole's combination. The Feather Stitch and Lazy Daisy are perle #8, the Pistil Stitch and French Knots are perle #12.

WS2c

This combination is mine - I have been using this combination of four, three, two, one wrap French Knots, followed by a straight stitch, for some time on Feather Stitch. Just I am trying to find the perfect combination to show it off. The Green is perle #12, the pink perle #8. The French Knots are not as crisp as they could be - I think I want to try it again using perle #12 there.

But overall, I like both of these.

Friday 21 April 2006

Good copy of Class Block

Block17

I have been working on how to get a good copy of my class block - and I think this is it. I took it to the local Officeworks and had them colour photocopy down to A4 size. I then scanned that. The detail is definitely better, and I think the colour more true.

There is a larger one HERE and ginormous (huge) one HERE. You can definitely see every misplaced stitch in that one.

Long discussions have been held with a local framer, and I have the backing board and will be doing the lacing myself, and then taking it back to be framed.

Progress is happening.

(Bet no-one noticed a few more buttons - one in front of the waste canvas machine, on floral one from Buttonmania bottom right, another small one from there, and a shell flower a bit above them, on the right. They are nice and cheap in Spotlight. And I have signed it, so it is definitely finished.)

Wogga Stitches 1

Time for a bit of a catch-up on stitch combinations. The idea of using the Wogga as a sampler is good - just it means I am not going to pull out failures to make perfect. And you get to see the combinations here in all their imperfections.

WS2a

The one above is straight out of my brain - using the lines let me put very big Cretan stitch fairly evening (perle #8), all the rest except the green (Dentelles) and yellow is perle #12. The trick with this was getting the half flowers every second arm, which let them fit in, and use the white line for emphasis.

WS1a

This is another of mine - just doodling as I went. I have used the stacked lazy daisy (dark blue, bottom) before, and it doesn't show up all that well. I am definitely moving towards dark on light and light on dark for these blocks. The lacing of the Chevron (blue on green in middle) was a last-minute thing, as it just looked too naked.

WS1b

This was my first attempt to replicate a stitch from the Davis jigsaw quilt - except the mauve French knot is mine. The stitches to either side of the lazy daisy are Pistil stitch (a French Knot that "migrates") and what I learned was that, to get them facing the different directions, I had to wind the French Knot a different way each side. Not easy. Needs more work. This is where I realised perle #8 was too big and bulky for small stitches, so the Fly stitch at the bottom is perle #12.

Think I will persist with the top bit in perle #8, as it bulks up the French Knot. Just I will have to make them Lazy Daisy (aka Detached Chain) a bit larger and spaced out more.

WS2b

This is my most recent attempt to get a stitch combination out of the Davis quilt. The problem with the picture is that it is upside down to the way I worked. I started on the right-hand side of this picture - can't you tell! First I tried to eyeball the size. No way! Then I tried the handle of a knife as a gauge. Then, on the final one, I was using a see-through ruler to measure. I am about to chop up a plastic ruler so I can use it all the time.

Edna Force Davis obviously liked this combination, and used it a few times. And in the little detached bits, she closed her Fly Stitch with a French Knot. Interesting. I have something in the back of my mind about Tete de Boeuf Stitch, but I cannot find it in Sharon's Stitch Dictionary under that name, or Bull Stitch - but this reminds me of the glimpse I once had of that, somewhere.

Off I go to Google - and I found it on Rissa's Pages. And no - that wasn't it.

My DH says I ramble - he is right. It is he who has been enjoying himself saying "don't forget to get the perle #12" as I go out. Smarty just wants to pretend he understands sewing. I have mentioned before that his mother was a dressmaker, but while I was in Melbourne a couple of days ago, he was at the records office chasing his father's mother's will. And is he chortling. Despite being a woman of some property, what was the absolute first bequest in her will? Her Singer sewing machine, to say which daughter was to get it.

So although he cannot remember his father having a bag needle (he was bricklayer, you cannot sew bricks together), he is claiming an impeccable pedigree for sewing on both sides. And he says all the bonds and patterns used in bricklaying are just like stitch combinations for blokes.

And yes - I ramble. I need coffee.

Thursday 20 April 2006

Buttonmania - the BIG post

I finally have my pictures uploaded, so this is the BIG post with the news and views of Buttonmania from yesterday. The pictures of the jacket and skirt were really just to tempt.

Buttonmania is a lovely little hidden treasure on Level 2 at 37 Swanston St, Melbourne (next to Subway, almost on the corner with Flinders Lane). It is operated by Kathy Boulton, who is covered-button-maker to the fashion trade. Just before the Spring Racing carnival is not the best time to visit, as she is extremely busy.

The building itself is very historic (and so are the lifts!) and was at the heart of the rag trade in Flinders Lane.

Kathy has a huge range of buttons, many of then vintage - this is just one section of her stock:

Buttonmania6

But the lovely thing is the other stuff as well. Kathy is a crazy quilter, too. So she has things like ten cent button boxes. This is the white button one:

Buttonmania7

There were heaps of what I would call vintage buttons in there - I have been collecting ones with four holes lately, as I like the possibilities they give for embellishing in button clusters. I think Kathy would be open to mail-order requests like "Please send me 100 buttons out of the ten cent box" - she is that sort of lady. But maybe you had better e-mail first and ask.

Then, I got into the ten cents each covered button box. This is what I chose (in a hurry!):

Buttonmania3

Again - can you imagine the fun if you ordered 100 covered buttons, to see what you got in the mail. Kathy did mention that is she is making covered buttons (she does them on a machine that is 100 years old - I need to go back and beg to be allowed to see that one), that she knows are going to be beaded, that she puts wadding underneath the fabric on the button to make them easier to bead - sounds a good tip.

There were other things I didn't get to look at. Judith picked up three rolls of fabric scraps, and I didn't even got a chance to have a look at the, check prices or anything. I need to go back there.

Because what happened was Kathy said that she is hoping to open a button museum in her "big room" next - and "you've seen the big room, haven't you?" I hadn't, so she showed us. Which is where we saw the jacket and skirt, and lots of other things. And this is where she will be teaching classes in future.

I have always known Kathy was instrumental in the Victorian Button Collectors Society (not sure if this is what they are actually called), and I wondered after I left if this is where they meet. So I googled away, and found that they meet in Burwood/Blackburn, but that people out there even blog about them. That link leads to this post - there are more blogs out there I need to explore.

Here are just a couple of views of the sorts of things that are already in the future museum - one of several showcases, and some hand-painted silk buttons that are over 100 years old - made for a wedding that was cancelled.

Buttonmania4

and

Buttonmania5

So, it is Thank You, Kathy, for allowing us to see the big room, and thank you, Judith, for giving me the excuse to go there in the first place.

You can see larger copies of most of these pictures by going to my main Flickr page, finding the pictures, opening them, then choosing "All Sizes". Some are quite large.

I hope you have enjoyed our visit to Buttonmania. And Kimono House.

Meeting Judith

Yesterday fates collided at just the right time, and I had the wonderful chance to meet up with Judith, of Judith's Material Musings, who was visiting Melbourne from New Zealand. Judith was also part of the recent classes with Sharonb, so I think we can claim the first international meeting of class students - I think I spotted one from the USA just the other day.

It was a delight to be able to meet Judith, and spend time with her. We looked at each other's class blocks (hers is beautiful), and I was given the privilege of seeing a very beautiful and special crazy-quilted book that a number of her friends from another list had made for her. I hope that if Karen (I think it was you who put it together) (even later note - sorry - thanks Karen, it was Pat!) and any of the others from that list are reading this, that you already know how special that book is - your work and your thoughts are something that I cannot quite find the words to describe. But hopefully you know what I mean.

So Judith and I shared the excursion to Buttonmania and discovered Kimono House together, and then only had time for a quick coffee and sandwich, before I had to head to my next appointment.

But it was a wonderful opportunity to meet a Stitching Sister - thank you, Judith, for your time, and sharing, and for saying ahead that you were coming. I am not in Melbourne often now (it is two and a half hours away), so it was meant to happen. I shall read your blog even closer in future, and I feel I know you so much better now.

Edna Force Davis Quilt

Many years ago (ie in the 1980s) I purchased a jigsaw of an old, 1897 Crazy Quilt, which turned out to be by Edna Force Davies of Fairfax County in Virginia. I think it is in the Smithsonian.

This is one quarter of the box.

Box2


I have tried a few times to copy the jigsaw, and then later its box, and have finally managed copies that I think do it justice.

The Flickr set showing all pictures (to which more will be added) is HERE. That gives access to verrrry large photos, which should allow the excellent seam treatments to be seen. Although when you first look at the set, you just see thumbnails, you click on them, and above that you should get a "View all sizes" That is where the really stunning stuff is.

I will do some more closeups in time, but just thought I would draw to everyone's attention that those that I have got up there are as good as they get.

Kimono House

Kimono House1

Yesterday, while Judith and I were in Buttonmania, two women came in looking for "the Kimono place". Our ears pricked up, and we asked. To discover that Kimono House, which had been a home business, had just set up on the same floor. (The website does not yet reflect the address, which is Studio 7, 2nd Floor, 37 Swanston St. It is an adventure finding #37 - next to Subway, and then finding Studio 7 - you might find Buttonmania first. Currently open 11am-6pm Wednesday to Friday, 11am - 3pm 2nd & 4th Saturdays. Phone 03-96390565)

So we just had to go and have a look - and it is very promising. There are kimonos, obis and fabric, and lovely packets of fabrics. Bag kits and other tempting things. Minimum cut on fabrics is 25cm (I had to get some for my apple/cherry blossom project that I will do one day, which is above).

And I also had one of these packs of fabric follow me home. There are nine samples for $10.

Kimono House2

So this all means that finding your way around in the Heritage-value lift, and then going to Buttonmania and the Kimono House is an experience not to be missed. More about Buttonmania (Kathy Boulton wants to open a button museum there), as soon as I can get the pictures organised.

Wednesday 19 April 2006

Classes at Buttonmania

Buttonmania2a

Hi Everyone,

Just a real quickie, as I am just home from Melbourne. Which included a trip to Buttonmania - this jacket and skirt is by Kathy Boulton from there.

Reason for the quick post - Kathy is starting CQ classes, and will have the first one this Saturday (think I have that right). It is a one-day class, from 10am to 3pm, $125.00 includes your lunch and all fabrics (I know Kathy's fabrics!!!!!).

Participants need to bring sewing kits only (although ask Kathy when booking if more machines are then needed).

More about Buttonmania in the next post, and my day, when I get a minute. Just thought I would mention this - I haven't had a chance to see Kathy's crazy-patch work, but she is a legend in button circles.

In the meantime, here is a closeup of the jacket with the skirt Kathy made them for a competition at a fashion parade, where people had to guess how many buttons and pieces of fabric were used.

Buttonmania1a

Tuesday 18 April 2006

Woggas and Blokes with Needles

This is just a really fast run-through, as real life is busy.

As I was fascinated to see long and thoughtful posts about Woggas/Waggas from sharonb and from Robyne. Because, although I do not want to get too hung up on definitions, I do have to say that probably my current project is not really a Wagga, but is more "A Crazy Quilt inspired by a Wagga". But I will keep referring to it as a Wogga anyway - it is more convenient.

So, why do I say it isn't a Wagga? Because to me, a Wogga is something utilitarian, produced for warmth, from resources to hand that are not usually first consideration for warmth/bedding. On mine the embroidery is equally, if not more important.

My father would have been 100 this year, were he alive, and he spent the 1930s Depression as an itinerant single man - by choice and inclination. He was a rabbit trapper, with his own plant, and had a good income. In the 1940s he bought land and became a grazier - although rabbits were still trapped for income and pest control. But he always had the Depression ethic of making do with what he could, and wasting nothing.

When my mother married him in 1948, their first quilt was what she says he definitely called his "Wheat Bag Wogga". This was just wheat bags he had sewn together, that went on top of the bed. It was heavy, and Mum found it uncomfortable, so it got short shift, and went fairly fast. Wheat sacks were very closely woven, heavy and scratchy. Sugar bags (used on others I have seen) has a much looser, lighter hessian. Despite that, I can still recall him occasionally calling anything quiltlike that you wrapped yourself in, in cold weather, a wogga.

Which got me thinking. Bag needles, as I was growing up, were my father's tool of trade, not my mother's. They were something that was in the shed. There was a time when there were men working with harvesting teams who were the bag sewing specialists, and I suspect a good bag needle (they were large and curved), were an important tool of trade for them. I don't think my father ever worked in that line, but a rabbit trapper always had several rabbit screens - long tunnels of hessian strong on poles between trees, carefully closed at the end of keep flies out. This is where they were stored until the rabbit buyer came by on his rounds, collected the rabbits and left the money for them in the screen.

The bag needle was an important tool for a rabbit trapper, both for making and for repairing rabbit screens. Sewing up wheat bags to make a cover for the bed would have been second nature for my father, who would have sewn many miles to make his screens. Both he and those who sewed up the bags of wheat and maize, used sting in the needles.

The bag needle was therefore a valued tool of trade for men, so it may not have been unusual to find men sewing with them for more than just occupational work. Did they then, at night, turn to making their own bedding in much the same way as sailors turned to re-using old ropes to make macrame, and their hammocks?

Would be fascinating to know how many Waggas were actually made by men, as opposed to women. And how sewing was viewed at that time by men.

And I would love to hear more, Ulla, about how you say these quilts were in Sweden.

Without getting too hung up on definitions - and I must see if I can find any more in collections around here.

Monday 17 April 2006

Copying my blog

Something that has been exercising my mind for the past few days, since I had my second e-mail melt-down, is how I should archive my blog. Just in case something happens, and all of a sudden they disappear off the net. Yes, I know it isn't supposed to happen, but there is over 12 months on there now, documenting almost my every stitch.

I have copies of what is on Flickr, but not what is on my blog.

So, in idle moments, I have been calling up each month from the archives, and using the "save page as" function (I am in Mozilla, I assume other browsers are the same). Each month gets saved as a file, with a corresponding folder that includes all illustrations for that month. I will save them off then on DVD - they are big files.

Is anyone else doing anything????

Am I panicking?????

I am gone now for a couple of days - back around Thursday.

A Common Thread (Brodeuses)

I have just had a chance to watch "A Common Thread" (English title) or "Brodeuses" (French title) on DVD. It tells the story of a young, single pregnant woman taken in by an Armenian (?) woman who embroiderers for the Paris fashion trade. They use a rather interesting sewing machine, but also do some large-scale sewing, which I think is Tambour beading, that was fascinating to watch.

If you happen to see it in your local video shop, have a peep. I had to search to find it, but it was worth it.

Sunday 16 April 2006

Nancilyn's Block

Do pop over and have a look at Nancilyn aka Fibredabbler's finished block from Sharon's class. It really is worth the trip, and her close-ups are just wonderful.

Thanks, Nancilyn, for the details in your post. This is an exceptional block. My favourite parts (go find) are the beading on the bodies of the two birds with their backs to each other, and the cob of corn in front of one of the birds.

But it is a real "I spy" block, and there is heaps more there I haven't found yet.

First block and edging

Wogga1b

The first block is finished. Sort of.

I am going to edge all blocks in crochet - I have seen this once before with a crazy-patch, and it really suits this type. I turn it over, draw an eight inch square on the back, and where I can, cut the foundation back to that line.

Then I turn the edges over, tack/baste them and press. These fabrics take pressing realllllly well.

Then I blanket stitched around, varying the colours of the cotton as I went. After that, it was once around with purple perle #8. I am going to use all purples, but vary them.

I am still deciding if I will then do one round of double crochet - I think I will.

Later, the blocks then just get stitched together - maybe stitching them onto backing as I go.

Until then, they will stay as single blocks. And I will resist the temptation to back them block to block and make them into a book. Which would be wonderful, but useless as a wogga.

And, until they are joined, I can add more stitches. The large fawn patch in the middle is begging for more, and those lines are so lovely to work with.

So this block is finished. Sort of.

Wogga Block2

Here is my next block in the Wogga - which I am enjoying very much.

Wogga2

For this one I wanted to experiment with piecing from a corner, not the centre - so not using a five-sided centre piece.

Judith Baker Montano has a similar method (p.24 The Crazy Quilt Handbook, 2nd edn), but she still comes out from a five-sided piece, but in the corner. And she trims back a lot - hers is a lovely, large and complex block.

I wanted to try doing a fan first, and worked without trimming back. And I am quite happy with the result.

Here is an exact plan of the block, showing the patches in order.

Wogga2a

Patches 7A and 7B were first joined off the block, and then added as one. With hindsight I should have run the line between them at the other angle, as it mirrors the long lefthand side of 4 - but stitching will fix all that. Patch 8 would have been better made from two pieces, but I wanted those nice long lines for my sampler stitches.

I am really happy with how Block 1 is going, but am not ready to show it off yet. At this stage I am entranced with the stitching process - the pure wool is thin and fine, and like stitching through butter. There is a little bit of wool felt in there too - not sure if I will be using it yet.

But I think I might stick with this piecing method - it is going to go well with the joining method that I hope to use - coming soon.

Saturday 15 April 2006

E-mail meltdown

Today I had an e-mail meltdown (someone sent something, I know not what), that means my e-mail program self-destructed. I am safe and virus-free, but if anyone e-mailed me between 9am and 4pm Eastern Standard Australian time, and is waiting for a reply - I didn't get it.

Stitching is more fun!

Wogga 2

Easter is being very relaxed this year, so I have been working a little on the Wogga.

Wogga1a

Sharon had us doing samplers in her online class, and I didn't get a chance to do one - so this is going to be perfect for that - the lines are brilliant for spacing.

I will be attempting to replicate seam treatments from my jigsaw puzzle, and will be posting them in my Stitch Combinations set at Flickr. (In passing, this is the first time I have organised the jigsaw puzzle into the Flickr set - it really did make me look again at how I file photographs! There are some more I will put up there, in time.)

But I won't restrict myself to just the jigsaw, although it is most interesting. I haven't yet found in there, for example, any Chevron stitch. Odd. But lots and lots of use of a straight stitch, and some quite complex.

I am getting quite excited! Marty did suggest I try a Rayon twist thread, but I think I will stick with what I have. I find that if I restrict myself (ie by thread and fabric limitations), it makes me do the creative bit some other way. One of the ways I tried this once was with this block, where I made myself use on DMC stranded (and maybe crochet cotton), in very set colours.

The wogga started off to be just Perle #8 crochet cotton, but it was obvious that wouldn't work for a lot of the fine stitches, although the bulk is good in others. So the #12 came out fairly quickly - and I think the DMC Dentelles tatting thread is not far away. The trick is to use good contrast, I think. And I need to think a little more about complementary colours for the blues, which is what suits mainly seem to be.

And I have discovered I don't have much in the way of blues, especially electric blues, in my crochet cotton. Now, purples and greens, that is another matter.

Friday 14 April 2006

My Class Block

This is a post that has been coming for a long time - the thinking things about my class block. What did it all mean? What did I learn?

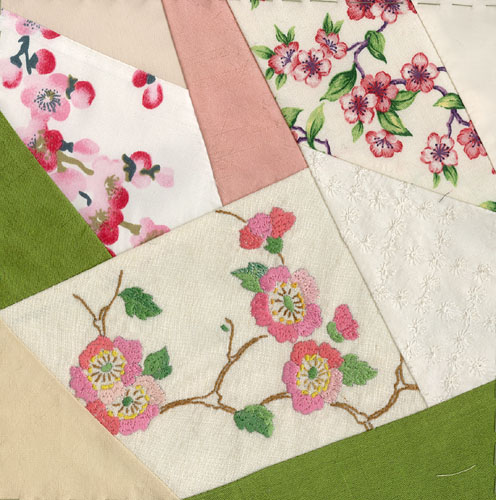
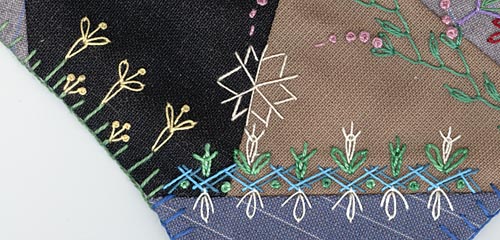
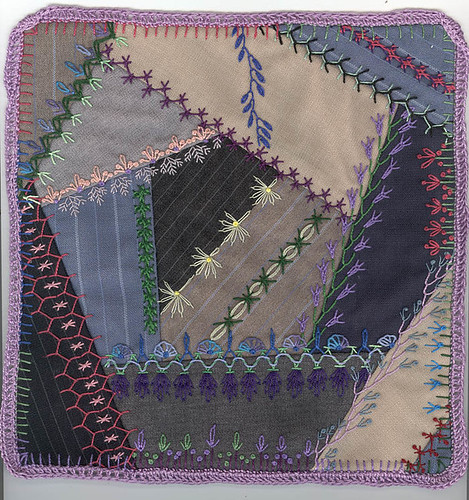
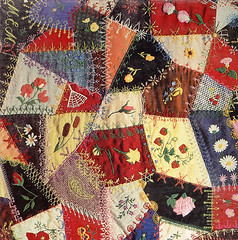
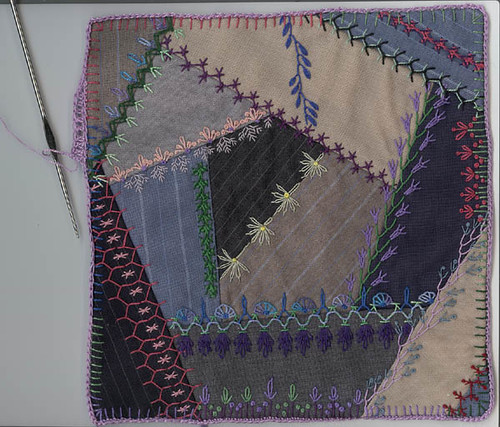
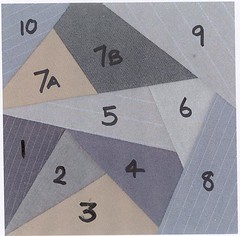
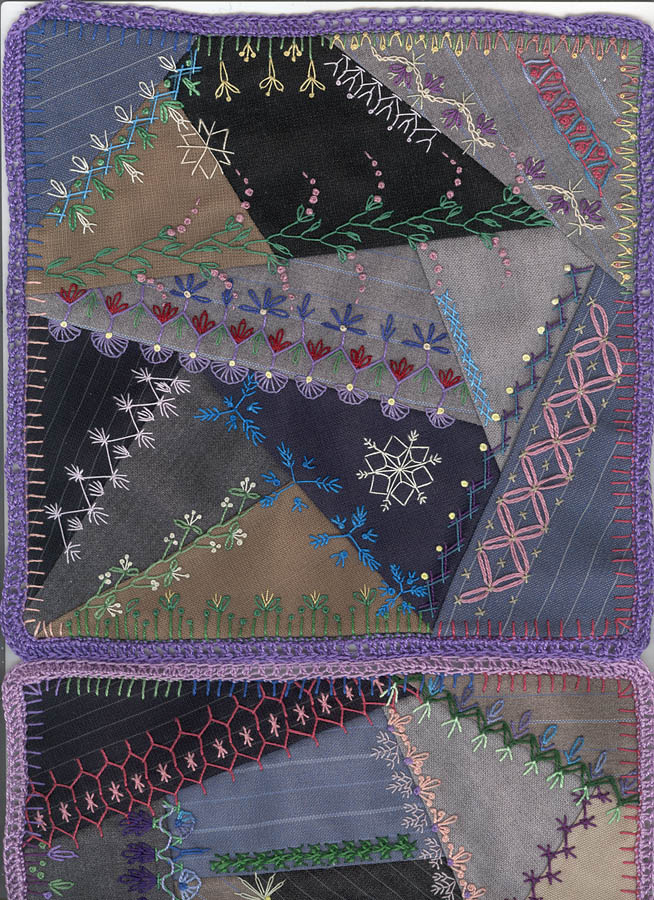
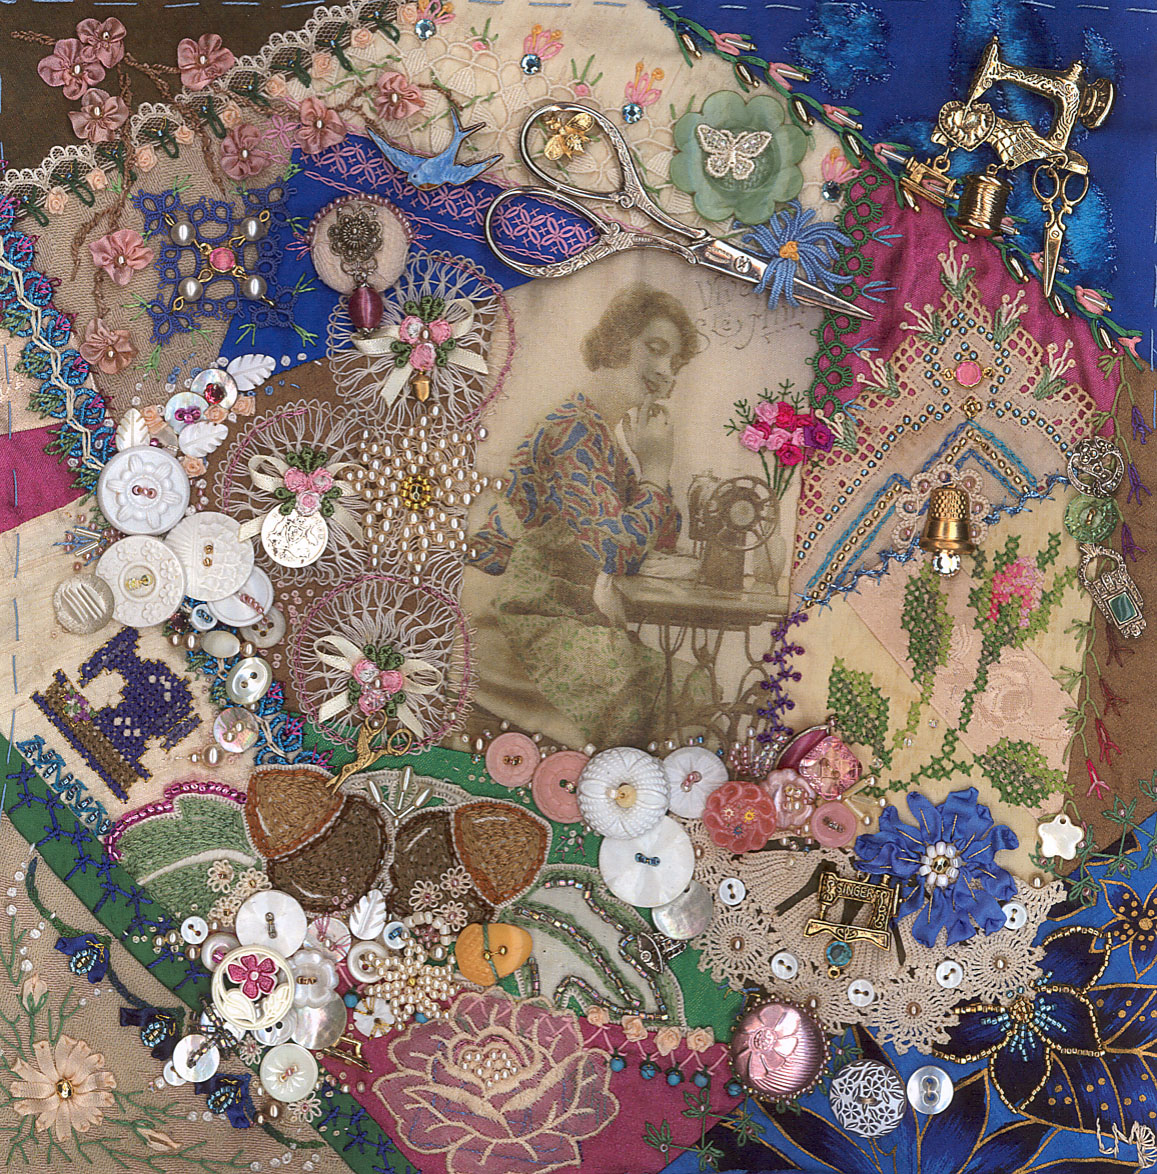
Just as a reminder, this is the block:

Block16

and all stages of creation can be seen HERE. I have just watched it as a slide show (blue link top right) and that is fun.

The block is a twelve inch one, and right now is extremely heavy. I think I will have to have it professionally framed, under glass.

Some of these points I talked about as I was making it, but I thought I would bring them all in again, in the one place. (In passing, I am working on copying and saving my whole blog, just in case. Will write about that soon).

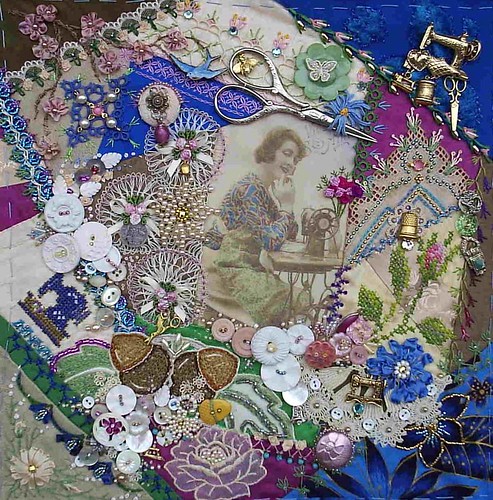
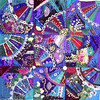
When I started, I wasn't going to make this block at all - I was going for rusts and olives (remember the tomato sauce on the kitchen bench?), but then I found this print, and decided it was finally time to make the "Homage to my Sewing Machine" block I had been thinking about for years.

The print is one saved from the net, found via Meggiecat. There are more out there in that series. After looking at it for a long time, I think it is a hand-coloured sepia print. So that gave me the colours.

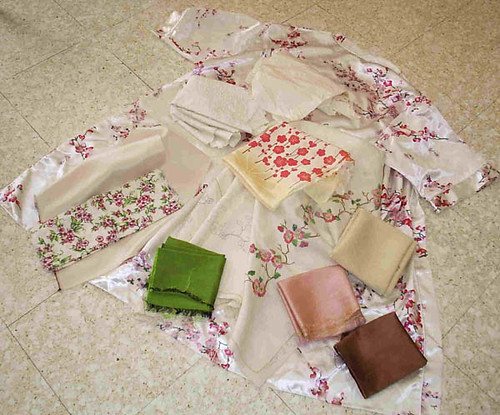
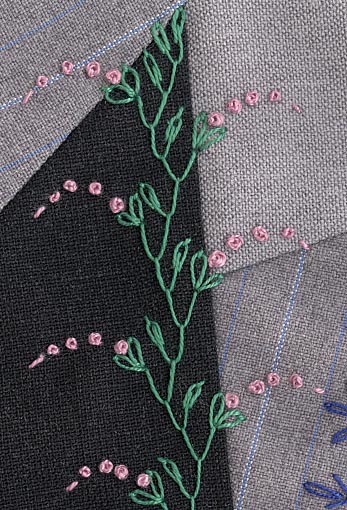
I decided that I wanted to add sections from doilies as I pieced, so there are four: the half a Hairpin lace doiley behind the woman, the whitework one of acorns below her, the crochet piece below the rose and the corner above the rose.

After that I proceeded along through the class process - seams and embellishments, button clusters etc. From fairly early on I knew I wanted to add a pair of scissors that had belonged to my later mother-in-law - she died aged 92 last December, and had sewed all her life. Before her marriage she was a sample-maker in the garment trade - not the fastest at the machine, but the best. I couldn't find the tiny pair of scissors I wanted, so chose the next best. They beautifully framed the figure in the centre.

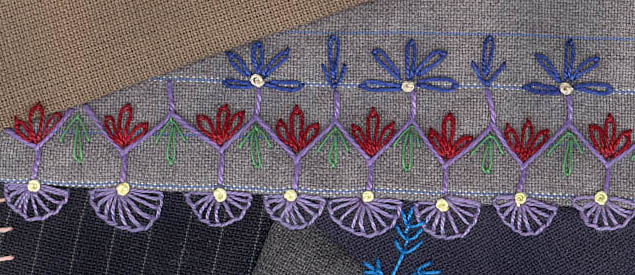
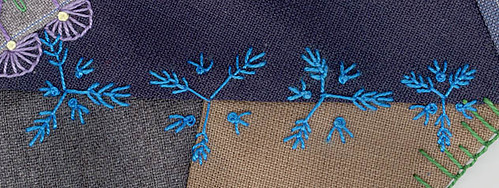
Some time during this process I added my trade-marks - tatting, waste-canvas-work (rose and machine) and chicken scratch (the pink on the blue behind the scissors). The block was getting pretty full when I remembered bead flowers - so one is in the centre of the hairpin lace doiley, the other in a button cluster.

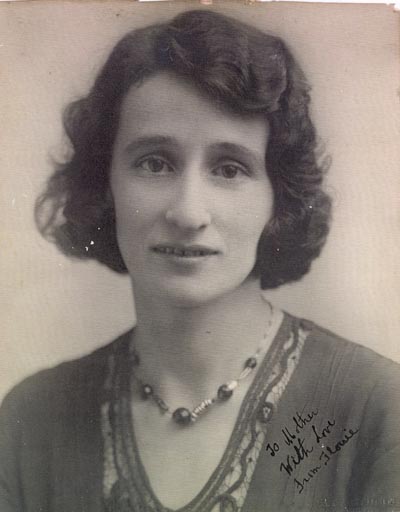
It was then, and only then, that I realised just how much the woman at the machine looked like my m-i-l (her name is Flo), would have looked at that age. This is a photograph of her in the early 1930s.

Flo

Finally, having decided that the block had intended to be about Flo all along, I went looking for a threepence from her year of birth - 1913. Only to discover that none were minted that year - nor were sixpences. So I settled on one from 1914, which is in the Hairpin Lace doiley - and that was the block finished.

And I still haven't signed it.

So, what have I learned in the class?

I am better at colour theory, and ready to take more risks with it. I think I am planning better, but will still change plans as the block develops. And I know that if I concentrate, with a realistic deadline, that I produce a better result. The stronger focus from the class really shows in this block, which is, I think, the best piece I have done.

The technical bits? Use more French Knots. Go and make myself deal with Bullions (I haven't yet). And go make samplers - more on that soon.

(And, having said that posts will be sparse in the next few days, I now have a few lined up. Then it will get busy again. Explain soon - but it includes things like snakebone necklaces and old sewing machines and dressmaker's shops ...... )