Thursday 31 March 2005

Cherry Blossom Fan

Would you believe, with all this discussion about Cherry Blossoms (and fans in RRs), that the ultimate arrived in my letterbox today. There is a pink cherry-blossom fan in the latest Australian Embroidery and Cross-Stitch. Which is just beautiful - and has a very different ways of doing the branches (not sure how much I can say without infringing the intellectual property!).

But suffice to say - I am off to try and finish Patti's DYB, so I can go to work on Viv's - which is going to have some of this Cherry Blossom on it.

(would love to post a link to Express Publications, but it seems their website is down). :(

Tuesday 29 March 2005

Apple Blossom finished

Apple Blossom7

I have been sitting with my feet up, finishing the Apple Blossom - and I am quite happy with it. For a first try. It makes me want to do more of this sort of work, where the design is on tissue paper, outlined in stitching, and filled in after the paper is removed.

This looks nice on the screen, but is about twice as large as it is in real life.

Maybe a butterfly next????

Quilts Launched

I can see myself heading for some serious recovery time. Today we had a lovely community handover for the Quilts of Unity, a project on which I have been working for over 12 months.

I really love these sorts of projects, where you use textiles to draw people in and then, all of a sudden, they are using them to get a message out there that they never thought they would be sending.

In this case, we gave people calico squares, and asked them to do a square for our quilts, celebrating a particular part of the town. Some are inspiring needlework, some are drawings by kids. But they all go together, and have made six quilts that reflect a community.

I'm very happy with them, but would like a chance to put my feet up for a little while!

Sunday 27 March 2005

More Apple Blossom

I have been playing with trying to transfer to Apple Blossom pattern to Patti's block.

Apple Blossom6

I was about to start pulling out the tissue paper to fill in the design, when I noticed I have missed a couple of petals. But I still think it will work - even though this tracing is smaller than the original design.

What to Make

Sharon is miles out in front at the minute - I could make a dressing gown. Wonderful idea.

If we have another Retreat, imagine the Breakfast gatherings (for those who have seen Catherine in her full glory, I would still be in the shade).

But there is just one problem - my slippers wouldn't match!

Saturday 26 March 2005

Apple Blossom

Apple Blossom5

This is a quilt that, in 57 years, neither my Mother nor I have been able to finish. And, even if we did get it finished - neither of us use supper cloths.

However the embroidery is very lovely:

Apple Blossom

So, after much discussion, Mum and I have decided that I should cut it up and use the embroidered pieces for Crazy Patchwork. And, that is where the trouble begins.

Counting UFOs, I have at least nine crazypatch vests. And I do not wear them all that often. And I have more wall-hangings than I have walls. And I don't carry a lot of bags.

So, what should I make out of this important piece???? I am visualising some of the Cherry Blossom fabric, and maybe edgings (but not embroidery) from other old doilies - to give it a lacy, Victorian look.

But if anyone has any ideas as to what I could make - I would really appreciate suggestions.

And, before I cut it up, I thought it best I record the design - it is only three elements, two large and one small. This is the smaller piece:

Apple Blossom4

My reason for doing this is that I went looking for Cherry Blossom (and anything like it), in books, without luck. So I thought, if I scan these, I can print and trace if necessary. So there is a larger image of this piece HERE, and of the other two elements HERE and HERE.

Apple Blossom3 Apple Blossom2

Now - I have too many UFOs to take the scissors to it quite yet - but it is going in the bag with the Cherry Blossom fabric, and I will start looking for the right doilies.

All I have to do is resist the temptation to piece it as part of a demonstration - because then I will be going too fast to do it justice.

Cherry Blossom for Patti

Cherry Blossom for Patti

This is the final (maybe) Cherry Blossom on Patti's DYB. Maybe I will add a few green leaves yet. The blossom is random tatted rings, sewn through. It is much more 3D in real life.

When I was looking for designs, I turned to Marsha Michler's Motifs for Crazy Quilting, but without luck. Which made me think of something else.

So now I am off to work on Apple Blossom - call back soon. I have something yummy coming up. And something else I have got to make a decision about.

Friday 25 March 2005

Boadicea

Well, this makes a change from the Easter Bunny!

Meggiecat is looking for images to share. So I have dug out one of my old playing cards - I got a lot for about fifty cents each at an Ephemera Fair. This one of Boadicea is one of my favourites.

Boadicea

The only time I have used it so far, I printed it on silk and used it on my CQ Bra - the one made for the retreat last October.

There is a high resolution copy HERE - just click on it with the cursor once you get there. The only trouble is, being a cheap printing job, that one may not be what you are after - so this one may be better - same deal with the cursor..

Thursday 24 March 2005

Bare Branches

The Bare branches are now on Patti's Block, just waiting for Cherry Blossom.

Linda for Patti2

I know how I am going to do it - I'm just not going to tell yet.

These branches are Coral Stitch in Gumnuts silk, with a little bit of other silk added to give a hint of green.

Trouble is - I have thought of yet another way to do Cherry Blossom - this may be a long process, and a strange block, Patti.

Wednesday 23 March 2005

Here comes another new project!

Hey Viv - look what I found!

Cherry Blossom

I have wanted to do something in pink and green for ages, just I didn't know what. Now I know - it will be cherry blossom. So I need to put this in a bag (I found it today at Spotlight), and then slowly add more pinks and greens to it.

Trouble is - I don't know what I am going to make - I am not the sort of person to wear pink and green.

I have a tendency to have little bags stashed away, where I am collecting on a theme for future projects. At the minute I am collecting old sewing machine images for a future "Homage to the Machine" piece.

Just I need to get a few UFOs finished before I start any more.

Jenny's Tie Guts Quilt

This is one of my favourite quilts, made by my friend Jenny. I have just been reminded of it as there has been discussion on one of the lists about using silk ties. We were cutting up a lot of ties, and Jenny asked if we ever used the "bits inside". I thought she meant those usually dark, triangular pieces of lining. I said we did, and the blocks made looked very Amish.

Jenny said no, she meant the "tie guts", the usually white, sometimes woolen bits in the middle. And she went away and produced these blocks, which have a few other light-coloured pieces in them - all recycled - she is proud she had bought nothing to make this quilt.

These are some of the blocks, before she started to embellish.

Jenny's Quilt


Then, Jenny sashed the embellished blocks, using a recycled satin dress. With this as the final result.

Jenny's Quilt

The only other use I have found for the white bits in the middle is they make wonderful pages for needlebooks. But I still think this quilt is one of the most brilliant I have seen.

Tuesday 22 March 2005

Thinking about Patti's block

This is the block I did for Patti in the last DYB (Doing Your Block)

Linda for Patti

So, when the parcel arrived in this round, it was like meeting up again with old friends. I have chosen one to work on, and with no real plan in mind, started on seams. I was trying to suppress my determination to do the same rosebud as last time! So this is how the block looks at the minute:

Linda for Patti - prelim

I think at this stage that it calls for Cherry Blossoms - but I am still considering.

In the meantime, those from the last DYB and two from this DYB are on Peggy's Forum - you do have to register and sign in to see the pictures, and then choose the "Doing Your Block" forum - but it is worth it. Look for the two lots of DYBs for Patti.

PS for those not used to this format - it is a Round Robin with a difference. You make five blocks and send them around - each person embellishes one block - so you get back five with five different design approaches - and have to then embellish the sixth block yourself. It produces some very interesting results.

Feather stitch treatment

Just while I had the scanner going, I have been meaning to scan this for a while.

Stitch Combination 2

This is my treatment of Feather Stitch, on my purple vest. So it has got a little worm and some threads are out of place - but it is still lovely.

First I worked the Feather Stitch, and then I went back again and worked a small straight stitch a short gap from the end of each "branch". Then I threaded a needle with a thicker thread (in this case Colourstreams silk). I came up at the end of the feather stitch and then wove the silk three times through the straight stitch and the feather stitch - pushing the eye of the needle through first. Then I went back through the fabric.

It shows up really well in this example, as there is really good contrast.

I really love Annie's blog, where she is going back and looking at her old stitching. I reckon we should do that more. Now, I really had beeter go and work on the paperwork for those quilts.

Coral Stitch and Cherry Blossom

Viv has got us all fascinated with Cherry Blossom. Makes me want to dig out a half-finished tablecloth with Cherry Blossom on it.

But, in the meantime, I really want to explore random Coral Stitch as the bare branches, like this:

Coral stitch

This was just a hurried piece - the Coral Stitch works best in a thicker thread - this is in one strand of "Gumnuts" "Buds" - a thicker, overdyed Australian silk. Maybe I mixed two different colours, too. Now I am thinking how to make individual little Cherry Blossoms in tatting.

Look out Patti - I think it is going to happen on your DYB. But not instantly. I should not be goofing off playing here, when I have a project launch for something I am working on next Tuesday, which is not finished.

Maybe tonight I get to put the branches on Patti's DYB.

Monday 21 March 2005

Thinking about Patti's DYBs

Not a lot of stitching going on here at the minute - but I have got Patti's really lovely DYBs. And the work of Anne and Catherine on them is very lovely, so I cannot wait until I get a chance to scan them.

I have been in a DYB (Doing your Block) with Patti before, and I THINK these colours are similar - so I am going to have to watch myself, and not do exactly the same. My fingers were immediately itching to do the same rosebud as I did last time.

The other thing that I noticed was the way I looked at the block. I always tends to have a "top" and a "bottom" when I work. I know other CQ people who definitely do not - they work as if it will be looked at from all directions, like Australian Aboriginal art. And Patti had written her name and address across the top, on the excess foundation. So I automatically held it that way, and started planning my layout.

It wasn't until later that I realised I hadn't looked at it from all sides. So I did, and I still liked it the way I had looked at it first.

Friday 18 March 2005

Another Peacock Block finished

This peacock block is now finished - there wasn't a lot to be done to it, due to all the wonderful Round Robin work.

Peacock Block Finished

There is a very large closeup HERE. And you can see how the block looked before I started work HERE

The four main additions are a ribbon flower (with pearls and a gold bead centre) on the left, a Balinese silver peacock I found at the market towards the bottom, and a real Peacock Feather ear-ring I bought at Cann River on the way to the Retreat in October. And a small group of ribbon roses and beads in the bottom right corner, where I was filling a bare block.

Peacock Block bead closeup

The thing I enjoyed about this piece was picking up six beads at once, and going back through the first bead and back into the fabric. It made little 3-D loops of beads (so it needed to be an even number of beads, so there was no gap at the top). And they showed the little bits of gold thread between them.

So this picture is not brilliant - but it may give some idea.

Now I am off to work on a few seams between blocks - this UFO will be achieveable.

Thursday 17 March 2005

Another Peacock Block

There is a small window of opportunity for me to do a little more on my Peacock Wall Hanging UFO. So I have decided to work on this block.

Peacock Block1

This was a block from a Round Robin, and those who worked on it were Elsie (I know she did the white peacock), Carol, Melody (the feather top right?), Sue and Alison (around the black patch at bottom). I must dig out the booklet that went with it - one of my jobs is to document this block properly for the final book to go with the wall hanging.

I am not sure if I have previously posted a picture of the block on the net - certainly I cannot find one on my computer. And one of the advantages of flickr is that I can put up a larger photo (which is HERE) that people can decide if they want to look at - just click on it with the cursor if necessary to bring it up to full size.

I have started work on it now - there are just a couple of spaces to fill - the flower with the pearl beads around the gold one is my work, and I am starting on a small mixed-media trail on bottom right.

In the final construction this block is at the top right of the wall hanging - so there are a couple of special bits that may go on it - I would rather them safer towards the top, than on lower blocks.

St Patrick's Day

Green Butterfly

A Happy St Patrick's Day to Everyone

Wednesday 16 March 2005

Joan's Shoulder Bag

One of the things that I very much enjoy doing is showing off the work of my students on the net.

I have just uploaded pictures of a shoulder bag by Joan - you can see that page HERE. It is the same page that has a stunning photo of a cat vest by Anne - which I think is the best piece of student work I have ever seen produced.

If you have a wander around some of the links, you can see work in some of the other classes - Neighbourhood Houses are wonderful places - I still reckon anyone who wants to meet other Crazy Patchworkers, and there are none around - wander down to your local Neighbourhood House and volunteer to teach it - you will soon have heaps more Crazy Patchworkers around to talk with.

And the swapping and sharing every class is really good fun.

Fans for Alison

I have been working on Alison's Fan Block. It is not a large block, so I have been very restrained, and have only worked on it in two places, so as to allow others plenty of opportunity to put on fans if they want to. This is my first piece of work:

Linda for Alison2

Alison has made a very oriental block, and is asking us to work only in blacks, dark reds and gold/bronze. So first I worked the gold and bronze seam - in threads that I have found in my stash - I suspect they came from the 1970s, which is sad - I want more of them, and they are totally un-named. :(

Then I thought I would try putting a bronze button half under the organza wire-edged ribbon, to see if you could see through to what I am calling bamboo on the button. I then added a restrained bead dangle in red and gold, with the miniature Chinese coin.

After that, I went to work on the fan. I have made a number of small fan templates - I have been wanting to experiment with fans that are more "open" (ie the angle at the point is larger), than ones I had previously worked. So I got a few different sizes (a glass, the top of the rice container etc) and made some templates. This is the result:

Templates

For these, the angle always is in the centre of the circle - I still have to experiment with a few where the fan is flatter, a bit like THIS ONE.

In the meantime, I drew around one template with Tailor's Chalk, and went to work. This is the result:

Linda for Alison

For this fan, first I worked the outside rays/sides in bronze metallic chain stitch. Then I worked the centre ray, and a ray in the middle of each segment. Then the curve across the fan, down towards the bottom. Next I worked the Feather stitch (in Presencia #12 crochet/tatting cotton - I bought this especially as it was so dark red/black). After that I added the tatting (in the same thread), which I had worked especially for this fan. And then it should have been finished.

But I wasn't happy. When I work this section of tatting for swaps, I always start and end with the single ring, to sort of blend the start and finish gradually. It doesn't work with fans - each end needed to be a cloverleaf. But the fan had been embroidered to size, so I couldn't rework it.

When you have a fault - make a feature of it.

I then took some deep red metallic thread (Madiera Metallics), which is supposed to be stranded - but I just used the whole lot, and worked the outline above the tatting. Voila! That is what I wanted.

Finally, I tied a bow in the same metallics and added a few beads at the base. In other fans I would have extended the vanes of the fan down beyond the point to make a smaller fan pointing the opposite direction. But I was too near the seam marking the edge of the block.

Maybe on the next one I will extend the vanes.

Tuesday 15 March 2005

Preparing for AUS/USA swap

I have been in the AUS/USA baggie swap since it started - is it three or four years???? So I know from experience I need to keep it in the back of my mind and be working towards it through the year - September is not all that far away.

So I was delighted to be given this piece of fabric the other day:

Fabric


At the minute it is white cotton, but I am thinking what I can do with it. I THINK it is going to be dyed with Ozecraft dyes, and then cut into sections. Although I don't think they will be six inch squares - rather more irregular cuts to maximise each of the large motifs (which are Aboriginal art - although I am not sure from where, or if they are just a commercial rendition).

So - so far I have stamps and fabric - must start tatting motifs.

Monday 14 March 2005

Back Soon

Hi Everyone

Real Life has suddenly got very hectic here - I'll be back towards the end of the week.

Think Embroidered Fans!!!!

Saturday 12 March 2005

Alison's Fan Block

Talk about contrasts. Or seeing things in Black and White.

I have just finished a Cream on Cream DYB for Anne, and now am off to work on a black and deep red block for Allison in the Fan Round Robin. I have been very clever with being in two DYBs - one I have to mail at the start of the month, one at the middle of the month, so I don't ever have to concentrate on two at once.

Although it does mean I have constant round robins of some sort, and am not getting much done with my UFOs.

Anyway, this is Alison's naked block, as I am the first to work on it.

Alison's fan


Alison has asked I work only in blacks, red, and gold/bronzes.

And I don't get to fill the whole block this time - I have to leave room for four others to work on it.

Friday 11 March 2005

DYB finished for Anne

I have just finished my DYB for Anne.

Linda for Anne

There is a closeup of the block HERE

DYBS are a particular Australian/New Zealand Round Robin, where each person makes six blocks and sends them around five people. You get back five blocks, in the size and colour you like, but each one is embellished by a different person. So you have a wonderful example of the approach five different people will take to a block.

Then, you have to finish the sixth, least popular block yourself.

You can see what this one looked like before I started to work on it HERE, and you can see the one previous to mine, by Catherine, on Peggy's Forum. You do have to be signed in to the Forum to see the pictures, but it is worth it.

My trademark in this DYB is that everyone is going to get "real" cultured pearls - in this case they are on the bow on the bunch of flowers, although there are a few in the bead and button trail as well.

And I have added three of "Florence's Flowers" to this block - I have not done them for a while. It was Florence who showed us the flower centres of one gold beads with a string of miniature pearl beads around it. I had forgotten it, and had not done them for so long.

Thursday 10 March 2005

Bead and Button Clusters

Bead cluster

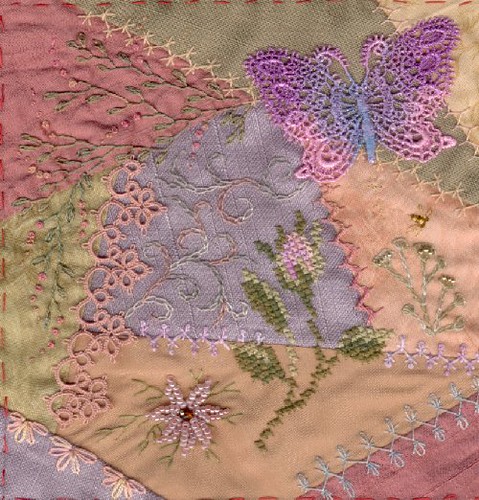
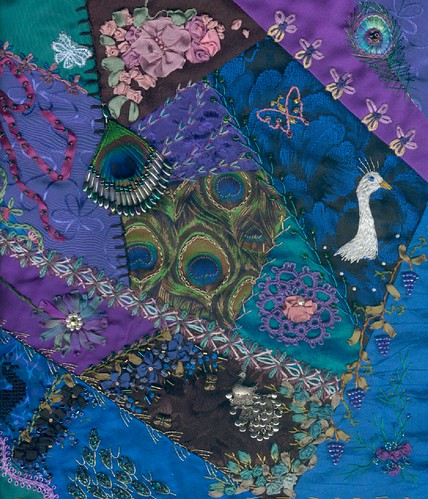
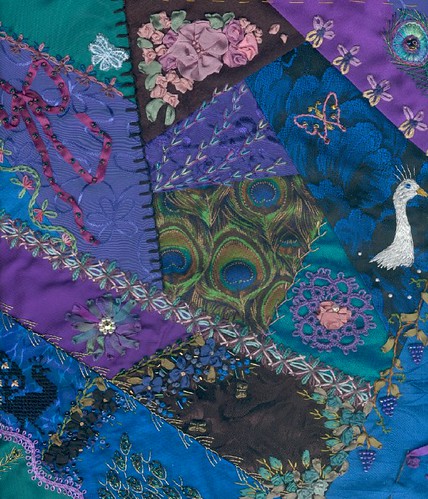
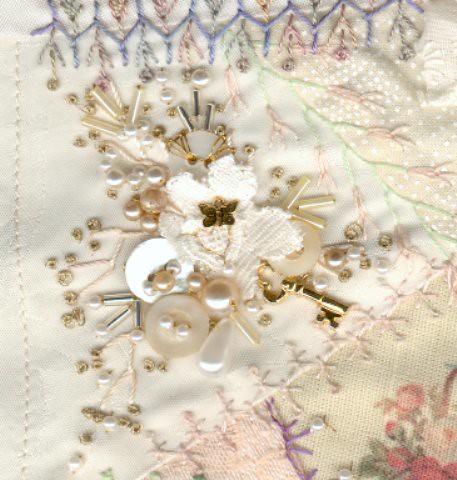
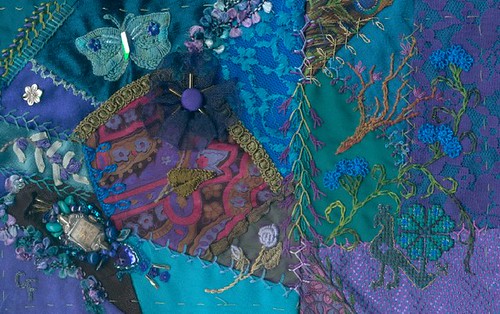
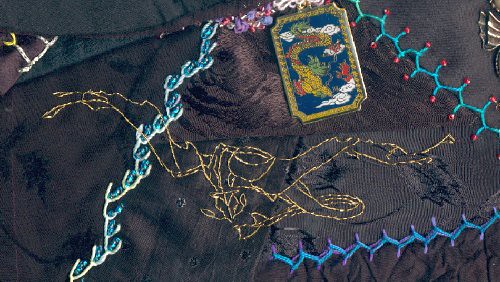
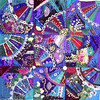
Today, at class, we were talking about Bead and Button (and Anything Goes) Clusters.

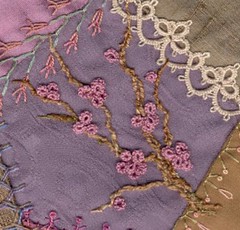
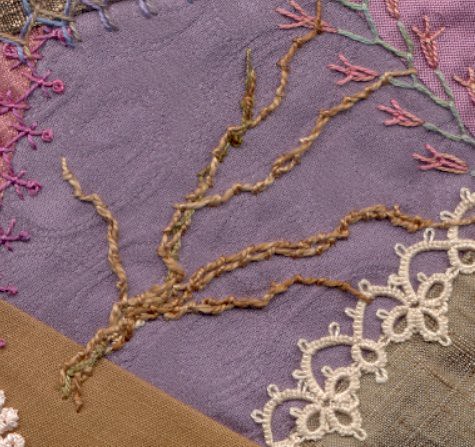
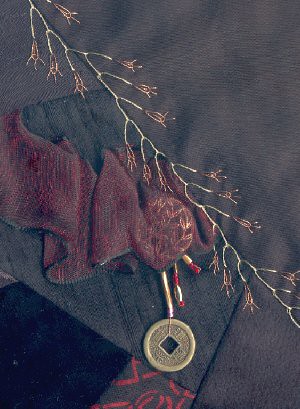
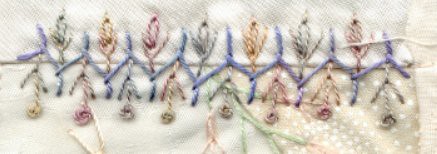
This is one I have just finished on Anne's DYB - and I am a little bit constrained by the small space I had to fit this into.

So these are the notes I did for class - and that is not to say I necessarily followed all of them. But just thought they might be of interest to a few.

~~~~~~~~~~~~~~~~~~~~~~~~~~

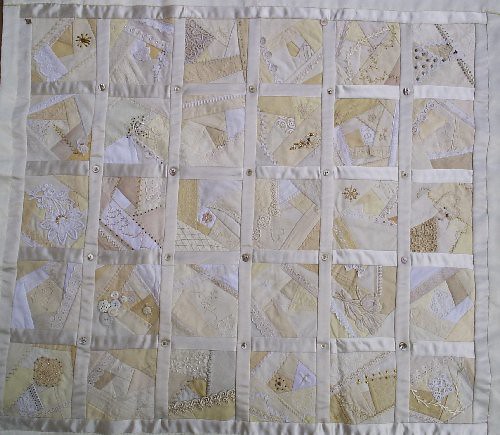
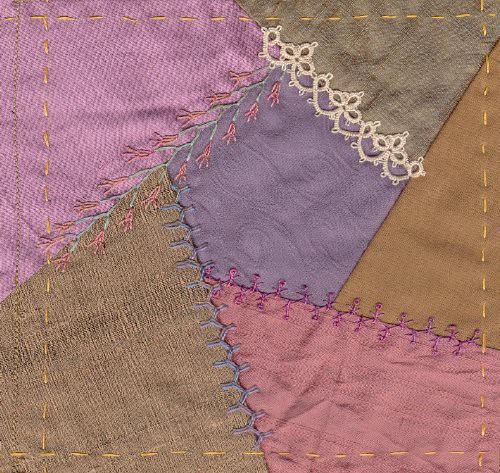
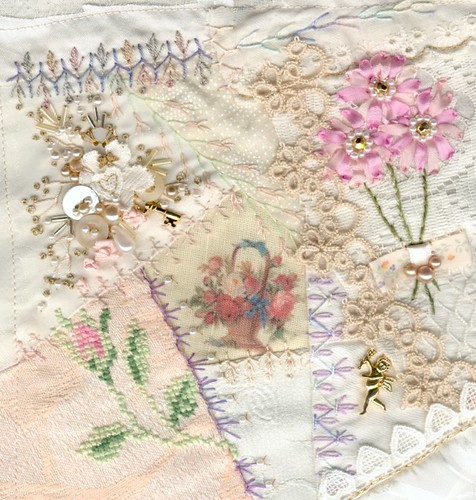
Consider using Beads, Buttons, Charms, Lace and Stitches.

This is One Way (there are many more)

Choose the centre of your work. Choose the size you want it to be. From the outside to the centre, Feather Stitch in. Go for an uneven number of “arms) ie not four or six, for example. Make different lengths. Make them uneven.

Consider bringing some in over and along seams.

Consider whorls of chain stitch (none shown above)

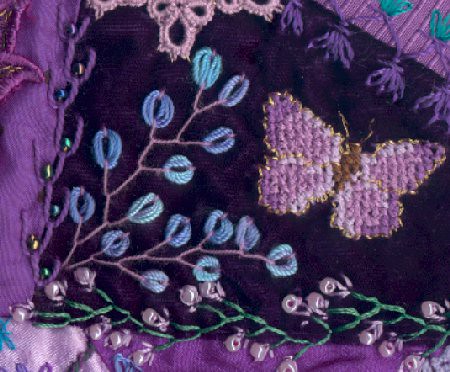
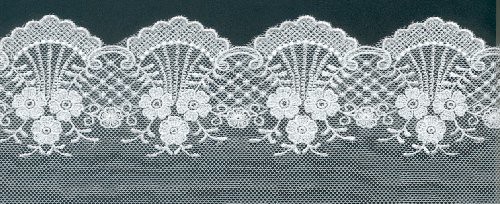
In and around the centre, lay down and attach fussy-cut pieces of lace. This is the “scenery”.

Think in terms of having one, large focal piece. This will be slightly off-centre. It may be lace or a button, charm, piece of broken jewelry etc. Make sure you leave the space for this available. This is the “star”. One possibility is a large button with a shank.

Add “chorus line” by embellishing the Feather-stitching and lace with further stitches. Consider using French Knots or little groups of three lazy Daisy Stitches.

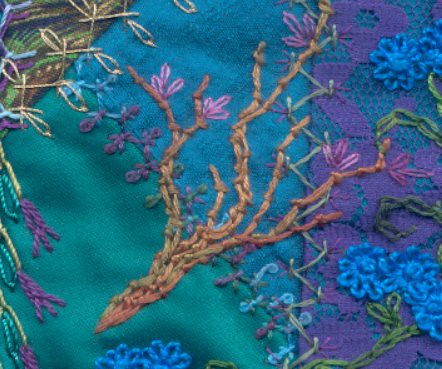
Bring on more Chorus line by attaching pieces such as small buttons, middle-sized to smaller beads. Leave them until now, as they will have got in the way when you are doing the stitching.

When you add the buttons, use interesting ways of fixing them (eg with seed beads, Lazy Daisy from the holes to the outside)

Give the chorus line a little bit of a chance to show off – like little groups of small beads. Consider little groups of Bugle Beads.
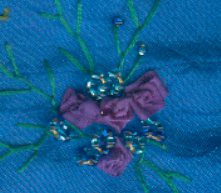
Add charms, which are a bit like “supporting principals”. Consider Spiderweb Roses, those little fabric roses you get in packets.

I use gold Madeira metallics, as it is strong, almost invisible, but when you do see it, you think it was supposed to be there.

Finally, add the “star”, or “principal” piece.

Applaud.

(Note - I am avoiding sequins. They are showy, and brassy and sassy, but they don’t last the distance and often tarnish.)

Stitch Combination #4

Stitch combination 4

Here is my latest stitch combination.

First I worked a row of Cretan Stitch (the blue).

Then I changed threads (both are over-dyed Kacoonda silks)

Then on one side I come up in between the arms and did a Fly Stitch with a leg that finished in the centre of the Cretan Stitch. The, in one side I did a Pistil Stitch in the middle of the Fly Stitch, in the other I did a Lazy Daisy in the middle of the Fly Stitch.

This is on a DYB (Doing Your Block) Round Robin for Anne. I am off to do a "Multimedia" bit (What would you call a bead/button/lace/thread/charm clump???).

Back soon

Wednesday 9 March 2005

Deb's Machine

Yesterday, when I was at Nan's Cupboard, I noticed Deb had this toy sewing machine there.

Deb's Machine1

So I had to ask her about it - and she knew nothing about it, apart from getting it a few years ago, and an assumption that it is Russian. This is the Instruction Book that goes with it.

Deb's machine2

There is a larger resolution version of the Machine HERE, and of the Instruction Book HERE.

If nothing else, maybe the wonderful people at The Needlebar will know something about it. Deb would love to hear any news of it at all, such as an age. Oh Dear, no. I should know better, shouldn't I? I will get a serial number (if it has one), next time that I am there.

Tuesday 8 March 2005

More from Nan's Cupboard

Nan's Cupboard

This is one of the items I saw in Nan's Cupboard that really appealed to me. Take one old, cloth dressmaker's mannequin, pin doilies all over it and then add jewelery, artificial flowers and other embellishments as the fancy goes.

Almost like a three-dimensional fibre-arts installation.

But that's the sort of place Nan's Cupboard is - see two posts further back for more details.

Nice Graphics

Sundial book

I tend to collect graphics from anywhere - this is a little book I have had for years, published in 1919, with a hand-coloured cover.

I reckon it would look rather nice printed on silk as part of a garden piece, or with just the Crinoline Lady cropped out and printed on silk. At a stretch, I reckon I can make her fan look like it is made out of peacock feathers, so I could fit her on the Peacock UFO.

If anyone wants a copy, there is a larger version HERE

Nan's Cupboard opens

Fan Lace

The People of Traralgon are pretty lucky. On one side of them, at Morwell, they have the Embroiderer's Oasis - which has every thread imaginable, and then other yummy stuff. On the other side of them, at Sale, is Jennifer Bee - who specialises in stumpwork.

Now Deb Griffiths has opened Nan's Cupboard at Traralgon. Which is where the lace (above), came from. People in the Fan Round Robin, eat your heart out.

Deb is specialising in laces, beads and stocks a full range of Ozecraft Dyes. She also has classes on dying with them.

Deb is open 1.30pm to 6pm, Mon and Tues, 8.30am to 6pm Wed and Thurs, 8.30am to 8pm Fri and 8.30am to 6pm on Sat. She is Shop 9 in Pergalia's Arcade, 29 Church St, Traralgon. Phone 03 5176 0669. e-mail Nanscupboard@netspace.net.au.

And right next door to her, at the front of the arcade, is Patchwork Paradise - a sane patchwork shop full of fabric.

I'm off to add her to my list of shops in Victoria. And I have another picture from there up my sleeve - just need to get it off the camera first.

A Realization in Texture, Color and Movement ...

Stephanie Distler in Pennsylvania in the USA has dropped me a note, and has been kind enough to write nice words about me in her blog, A Realization in Texture, Color and Movement ...

Stephanie is a little like me - living in a small community and immersed also in her garden. And I think I have stumbled across her before, somehow - how could I forget the Chainsaw Carvers. Yet another version of a CQ person (or allied kin) partnered with a Woodie/Chippie.

Her second blog is Moss Designs, where she sells some of her work - mainly beadwork and small art dolls. Which is exactly the sort of thing Sharon was writing about the other day.

Thank You, Stephanie, for the kind words - you are on my side-bar, and I shall return often.

Monday 7 March 2005

Linking to my Website

When I started off blogging, I wasn't even sure I wanted to admit exactly who I was - but I guess I had no hope of keeping it quiet. I sort of wanted to keep certain sections in different compartments, until I got used to this blogging thing.

Well, Sharon has inspired me to get a counter on this blog and on my website, and I am stunned with how many people are out there looking at my stuff. Just is it does seem to be two totally different groups, and I guess the blog (my unfinished works) and my site (the finished works) really complement each other, so I have decided to link them a little more than they are at present.

So, if anyone feels inclined to, this is a reminder that there is another online section on my work, in Linda's Crazy Patchwork Pages.

There is also a fair bit of organisational stuff there for Australian and New Zealand CQ people, which may have a little of interest in it for international readers.

Enjoy!

Sunday 6 March 2005

It's Autumn

Not a lot to repport today, as I am out in the garden. Autumn is arriving, with its leaves and crocuses. And cold, crisp days, and I need to spread the compost.

But Alison's block in the Fan Round Robin is here, and it is brilliant in black and reds, with a request for those colours plus bronzes. But I am away from my scanner - hang in there until tomorrow night, Fan people, and I will have a real treat for you.

In the meantime, it is compost, weeds, and meditations on Autumn colours.

Friday 4 March 2005

Bras Exhibition Report


If you would like to see or download a larger copy, it is HERE. I am also reliably informed that one of these ladies modeled Maureen's Bar (the verrrry pointy one you can see up on the wall HERE), but they don't seem to have published the photo. :(

Thursday 3 March 2005

More Peacock Blocks finished

Peacock Blocks

Finishing these blocks for my peacock Wall Hanging (my current major UFO) was a quickie. Chris did the block on the left, and I only had to embellish the join and finish off the block on the right - I had been demonstrating the Coral Stitch for the branch.

You can see how it looked HERE, before I started. But basically, all I have done is put in some twining vines for the tatted flowers, using two different Needle necessities over-dyed threads.

And the whole Wall Hanging is HERE. It is the main reason I started on this blog - I wanted to get a kick-start on doing my UFOs, and I think it has worked a bit. Now I need to go back and do some more seams on other blocks I have joined. Then it is join a few more. Now the blocks I am joining are bigger and bigger - I think it will finish in a rush - but not in March.

Wednesday 2 March 2005

Dragon finished for Chris

Dragons for Chris

I am just finishing off my work in the Dragon Round Robin - this is my gold dragon for Chris.

There are more photos on Peggy's Forum

Tuesday 1 March 2005

Fan RR

Just finished the third of three blocks I am sending off in the Fan Round Robin - supposed to be in the mail today, but I am only a day late.

Block for Fan RR


With this block I was experimenting with sewing in a thin lace edging between the rays of the fan. It was fiddly, as this is a six-inch block. It probably would be far easier on a ten inch block or larger.

The other two blocks I am sending off are HERE and HERE.

Ultimately, these three will be worked on by five people, and will join six other similar ones that are currently in a DYB, making a wallhanging of nine six-inch blocks. And the fans of twelve different people.

And I am avoiding all sorts of puns, like "Fan-tastic"